


 | |
| Story by vadjutka, Vanessa Published on June 4, 2008 in How-To | Photo by violetbella |
vadjutka.etsy.com recently submitted a piece on Hungarian traditional and contemporary crafts for the Etsy World Tour series. Turns out she has worked as a professional photojournalist. She now sells her jewelry on Etsy, and so she has some crucial tips for jewelry sellers who want to take great photos of their items. Read on, sellers, for more on exposure, background, angles, and more....
I think most jewelry makers have faced this problem at least once: how to take a good photo and how to style that photo to make the most of an item. In the next few paragraphs I'll try to sum up the practices I learned as a photojournalist — which could be useful for photographing still subjects like jewelry.
1. Light: Sharp vs. Smooth Shadows
There you are, with a beautiful piece of jewelry, ready to take some photos and list it in your shop. Right before you push the button on your camera, there are a few things that might be good to consider: for example, the angle of the light coming from outside (or inside), and the shadow it casts on your item. Some may like sharp lines, others may like smooth. For those who belong to the first group, natural light it is best, and it is useful to take pictures around noon, when the sun is high. Those who prefer smooth lines should shoot in the morning or after 4 pm.
Sharp, defined shadows:
.
[Dangle earrings by fantcastle]

[Crown necklace by spicychocolate ]
Smooth, diffused shadows:![]()
[earrings by shimmerglassjewelry]
[Mushroom ring by ctseibels]
Of course, most of us don't have time to wait for the perfect sunlight to arrive. What can we do if we only have time to shoot in the early evening, when the light is not so bright, but we don't want an underexposed grey picture as a result? We shall use the flash, but not directly — and ever so carefully! Using flash directly makes very bright white spots on the picture, because the light of the flash is not diffused to different directions. So either we can put a smaller white plastic card on the flash to diffuse light, or if it is not possible, cover the flash with a white tissue. It will result a brighter picture but without the distracting, overexposed bright spots.
2. Correcting the photometer
If your camera allows you to adjust it manually, don't be afraid to use it. At first it might seem a bit difficult, but one can learn it quite quickly. There are two main "numbers" we have to deal with: the shutter speed (the duration of time the shutter is opened) — its values are marked with 1/125, 1/60, 1/30 etc. — and the F-stop (the amount of light coming into the camera’s aperture) — its values are marked with numbers like 2,2, 2,8, 3,5, 5,6 etc.
Don't panic about having to measure these values manually, as the photometer built into the camera does it for us. Though built-in photometers react quickly — my photometer measures on nine different spots — at the end of the measuring process we get an average number. This means that if we do not correct the measurement a little bit, we might get a photo with over or underexposed spots.
If we want the darker spots to be more detailed, we have to add a bit more light: either with a lower f-stop or with a lower shutter-speed. Consequently, we do the opposite in case of overexposed spots — for example, when taking photos of a white, glittering or very bright jewelry, we add one or one-and-half to the measured values of the photometer, which means higher numbers of f-number and shutter-speed.
[measured by photometer and altered values, photo by vadjutka.etsy.com]
If we sit in a quite dark room, and all f-stops are gone (which means that the shutter is opened to its maximum size), we still have opportunities by letting in more light with an even lower shutter speed number. As far as I know, most people can make a sharp picture with the maximum value 1/30 of a second for shutter speed; below that, photos become blurred. So if the picture requires longer than that, we should use a tripod...or stabilize our hands on a sturdy object (in extreme situations it can be our knees, as well), hold back breathing, and shoot!
LINKS:
http://en.wikipedia.org/wiki/F-number
http://en.wikipedia.org/wiki/Shutter_speed
3. Go closer! - Making a photo essay
When I was in photography school, my teacher always asked me: “What do you want to say with these distant pictures? Go closer!” Luckily enough, we can get close quite easily when shooting jewelry, thus easily fulfilling what my teacher always wanted: one close-up picture showing details of the item, and one "big picture," showing the whole item its environment, or on a model. We should also take some photos from different angles: what does the item look like from the back, or from the sides? It is like telling a story, except in pictures and not in words.
[by yasminbochi]
[by lesthings]
[by juliery]
4. Background: patterns vs. white
An important part of telling the story of your jewelry in pictures is the background of the photo. Browsing Etsy, we can find a few main types of backgrounds: plain white, solid color backgrounds, and non-white, patterned backgrounds — usually with flowers, shapes or letters. The plain white background has an advantage: it is easier to photograph, and easier to take in visually. Using white as background has one more advantage: it intensifies the light, so it can help in taking photos of a darker item. We can use a plain white sheet for photography — that is what I do, or a white box (see here for a how-to).
An example of a white box: 
[photo by panyizsuzsi.etsy.com]
white backgrounds:
[fabric necklace by fabricfarrago]

[polymer pendant necklace by jkollmann]

[ring by KelbelleDesigns]
The advantage of a non-white background is that a good background adds a special meaning and an atmosphere to the jewelry, thus creating its own little world. Make sure to consider the look and feel of your shop as a whole. Ask yourself, "Does this background work with the overall branding and image I want for my work? Will my target buyers relate to it?"
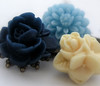
non-white backgrounds: 
[ring by pocketfullofpoesy]

[Cherry Drop earrings by nicoleleeartistry]

[necklace by TheHandOfFatima]
These are just some general tips. Within these constraints, the photographer can really get creative and best of all — let the jewelry shine as the center of attention.

video tutorial 1
video tutorial 2
video tutorial 3


.jpg)


mpravo guys !!